Showing posts with label ganache. Show all posts

Monday, 3 November 2014

Lindt Creation: Fraîcheur acidulée (citron frappe)


Product name: Lindt Creation: Fraîcheur acidulée (citron frappe)
Purchase details:
£0.99 for a 150g bar (99p Stores)
Calories:
394 per half bar
Country of origin:
France

Traditionally, lemon isn’t my favourite flavour, but this Lindt Creation: Fraîcheur acidulée (citron frappe) caught my eye as something different and, since I trust the Lindt brand, I thought it would be worth giving a go.


The packaging of this Lindt & Sprüngli bar was in French so I couldn’t read most of it but there was a helpful English translation that told me it was ‘fine milk chocolate with ganache and concentrated lemon filling’ which included concentrated lemon juice (2%).


On getting the bar home, I had a quick look online for a couple of further translations and found that ‘Fraîcheur acidulée’ meant ‘tangy freshness’. This alarmed me slightly as I was hoping for something a bit more mellow, but I was still optimistic that I’d like what was described as a ‘new chocolate experience’. The wrapper also advised that this chocolate was best eaten fresh from the fridge. This went against all my instincts about not chilling the brown stuff so I decided to compromise and eat half at room temperature and half cold.


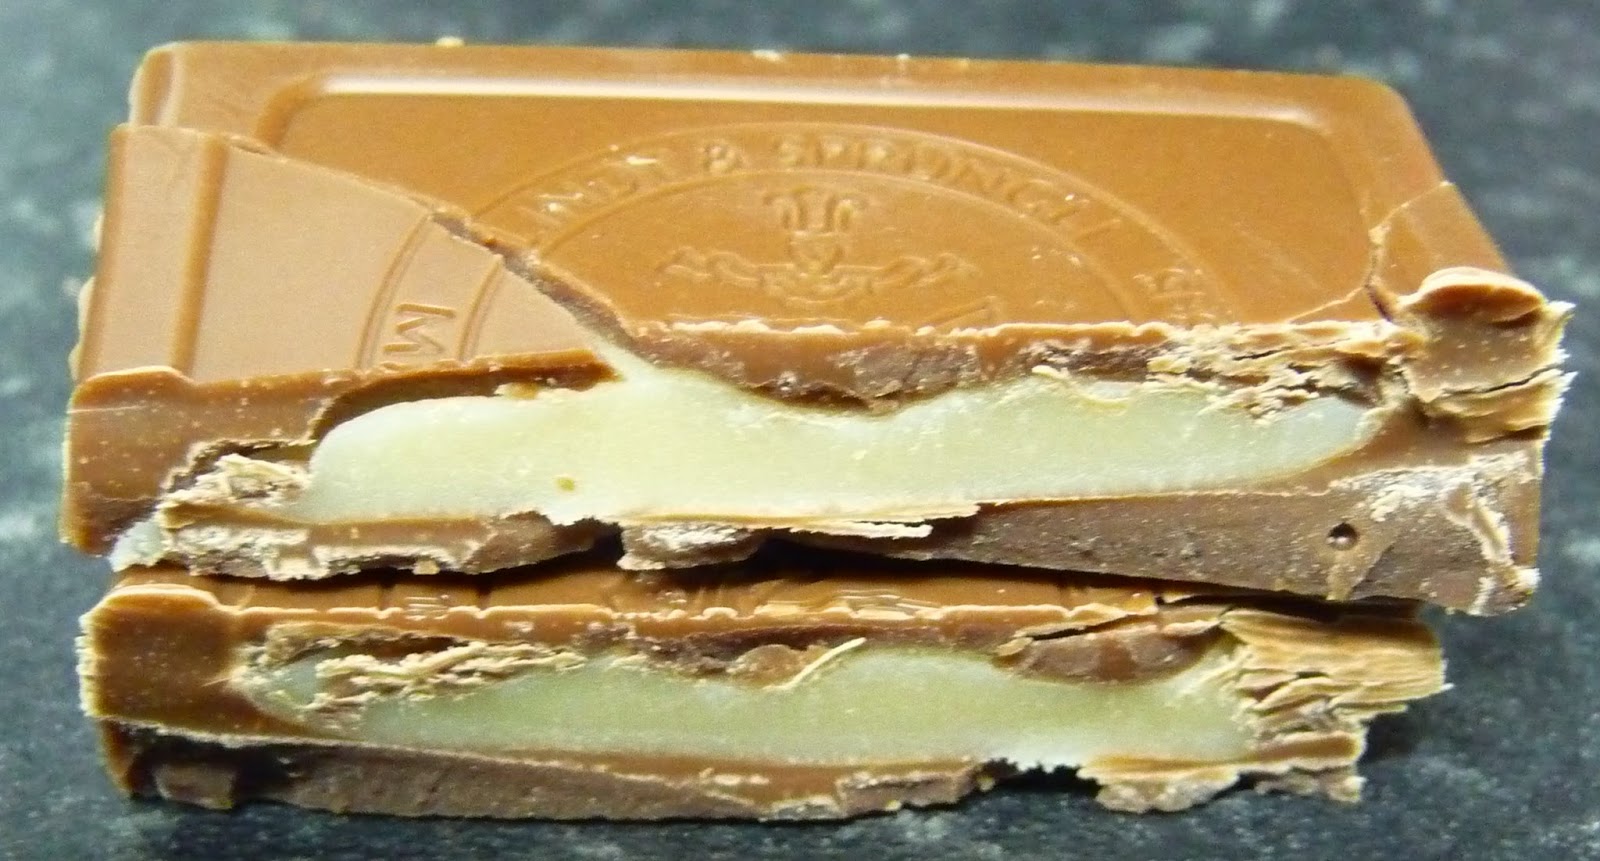
This bar had the same outer appearance as Lindt’s other Creation bars (such as the Coconut) but its very pale inside almost looked like Kendal mint cake. There was almost a hint of orange in the aroma but I could also smell a subtle lemon flavour – for me, its weakness was a good thing!


Starting with the room temperature half, I initially tried a couple of specks of the chocolate that had broken off and it definitely had a citrus element but, again, this was a bit like orange chocolate. On tasting it properly, though, I could tell that it was the usual Lindt milk chocolate, but a tang of lemon did remain on its surface when it was peeled away from the filling. This centre was a bit like fondant and very much had a lemon flavour but its strength was perfect and reminded me of what you get in a lemon meringue pie. It also balanced well with the creamy, sweet chocolate (although the lemon was the dominant flavour), and the quite thick, squidgy, gooey texture was very enjoyable. I can’t deny it was much nicer than I expected and a lot like a dessert. For some reason, it reminded me of Christmas, but I couldn’t quite work out why – I ended up concluding that I associated it with the kind of chocolates I find in gift boxes at that time of year! This was a lot nicer, though, and had enough of a tartness to the flavour that eating more than five squares at once would have been too much.


The chilled chocolate obviously didn’t melt easily (not helped by the large pieces meaning it had to be broken down a bit first!) but the lemon did seep out nicely when attempting this. The change in temperature made the lemon feel fresher, more concentrated and its acidity was a bit more ‘zippy’, but the main change was definitely the texture which had a much crunchier shell, and a slightly chewy centre.


Personal preference for unchilled chocolate meant that this was how I preferred to consume this bar of Lindt Creation but, either way, the variety was far nicer than I could have hoped and felt like such a treat.

Appearance: 8/10
Aroma:
7/10
Taste:
7.5/10
Texture:
7.5/10
Overall score:
7.5/10

Wednesday, 30 July 2014

Recipe: Nanaimo bars


Recipe: Nanaimo bars
Source:
My Kitchen Antics

We had a big family event at the weekend that required lots and lots of cake! I was happy to help and was asked to make something that would serve 20+ people. As well as being tasty, it needed to be something that could be stored for a couple of days, wasn’t messy to eat and, since I work full-time, I also wanted it to be incredibly easy to make or a recipe that I’d successfully made before. I opted for the latter...


I was first told about Nanaimo bars by a colleague in my old work. She told me they originated in Canada and, once I’d looked them up on Wikipedia, I knew I just had to make them. When the time came, I settled on this recipe from My Kitchen Antics (adapted from The Boy Who Bakes) because I was too lazy to follow a recipe that used cups for measurements, and I also liked the way it had added pecans to the base.


The first time I ever made these, I also made a peanut butter version (following a different recipe), and both types were a big hit. I’ve made this ‘original’ recipe again since and they turned out exactly the same – no problems! My memory did fail me, though, as I was thinking I’d only previously got 16 pieces out of the batch rather than the predicted 20–25, so I ended up making two batches for the weekend...I ended up with 40 slices. Oh well, the more the merrier!


For some reason, I didn’t read the recipe properly on this occasion, so I lined my baking trays with greased baking paper rather than foil. Whilst this did turn out ok, it made it harder to ease the finished product from the tins, so I’ll definitely be sticking to the foil in future!


The recipe was as easy as I remembered it. I used digestive biscuits which I whizzed in the food processor and the smell of these combined with the coconut was fantastic. When preparing the cocoa mixture for the base, I loved watching it turn silky and thick and, once combined with the rest of the ingredients, all the elements held together really well and left the mixing bowl clean once transferred to the baking tray. It smelt delicious and tiffin-like, although its slightly greasy appearance didn’t look promising in terms of any health benefits. (Who am I kidding? This was never going to be a healthy treat!) In terms of pressing this layer down into the tin, I’ve always found that the back of a metal serving spoon does the job nicely.

 
The middle layer was my only cause for concern on this occasion. When mixing the butter and icing sugar, it didn’t go smooth before I added the cream (as the picture shows), and I couldn’t remember if that had happened before. I carried on regardless and, thankfully, everything turned out fine. For this layer, I used a spatula to spread it evenly.


I was slightly nervous about the final layer of these bars as my last experience was of making an orange version where I made the stupid mistake of setting the heat too high and leaving the chocolate for the full two minutes without checking on it. The result was a burnt-tasting ganache! I definitely learnt from my error and had no further problems this time so I quite happily applied it to the top of the traybake with a palette knife.


The only downside of this recipe is that it does require patience in taking time to spread each layer out carefully (although I’m a non-artistic perfectionist so probably take longer than most!) and then leaving them to set. On this occasion, my start to end baking time was around five hours but, bearing in mind I made two batches, stopped for lunch, had a couple of fights with cling film (urgh) and realised part way through that I didn’t have enough icing sugar and had to wait for more to arrive, this seemed totally reasonable. Even better was the fact that I remained stress-free throughout!


Most importantly, the Nanaimo bars were as rich as ever. They had a lovely chocolatey taste with a subtle coconut flavour and chunky pecans. I guess they weren’t too dissimilar from other chocolate traybakes, but I think these Nanaimo bars were sweeter than most, although this was mellowed greatly by the chocolate. I’ve always found that the custard adds more texture than flavour, whilst the icing sugar provides a different, slightly grainy texture in the middle layer, which is also something different to other similar treats.

 
As for the crowd, they were definitely pleased – I only heard positive comments from those who tried them and some people raved and raved. I know I’ll be making these for years to come!

  
Ease of recipe: 9.5/10
Finished product:
9/10
Overall score:
9.25/10
Bake again?
Yes

Sunday, 1 June 2014

The Custom Cupcake Company Chocolate Decadence Cupcake (white chocolate)


Product name: The Custom Cupcake Company Chocolate Decadence Cupcake (white chocolate)
Purchase details:
£2.00 for one cupcake (The Custom Cupcake Company)
Country of origin:
England 

I think The Custom Cupcake Company has become my guilty pleasure – as soon as I have a non-diet day, I’m there!

Two of the apparently staple varieties that have been available on all my visits so far are the Chocolate Decadence Cupcakes that come in both milk and white chocolate. Since I’m a white chocolate fiend, I thought I’d opt for the latter on this occasion.


This cake was quite simply decorated but still looked beautiful. The yellow sponge was topped with a thick, swirled cream-coloured frosting and finished with three giant white chocolate buttons, a drizzle of melted white chocolate, and a sprinkling of edible glitter. The girl in the shop had told me that the treat was filled with a white chocolate ganache and this pale filling flowed almost seamlessly into the frosting.


As much as I love white chocolate, I often find that when it’s used in other things, its own flavour gets lost. However, on opening the carry box, I was surprised to be greeted by a white chocolatey scent. Having actually bought the cake two days in advance, I was also delighted to discover that the sponge wasn’t dry, and its sweet and creamy taste led me to believe that white chocolate had actually been incorporated into the mixture.


The generous frosting had a slightly crispy outer layer which gave way to a soft, grainy depth. As I’ve found previously, it was very sweet but, combined with the mellower elements of the Cupcake, I didn’t find this as extreme as the Berries & Cream Cupcake. The frosting and inner ganache also provided a lovely moisture, with the latter tasting gorgeously of white chocolate and having a fantastic smooth and partly solidified texture.


I’d definitely say that this was another treat for the sweet-toothed but the inner creaminess did offset this. As I’ve said, the subtle white chocolate flavour can be hard to pull off, and the sugary frosting did take away from this at times, but the desired taste was never completely lost and I think the addition of the fantastically sweet, creamy and chunky buttons played a part in this.

If I were to suggest an improvement, it would be to make the ganache a bigger feature – it was so delicious that it was a shame there wasn’t more of it! However, there is no denying that this was an indulgent treat exactly as it was.

I can’t wait for my next visit!

Appearance: 8.5/10
Aroma:
7/10
Taste:
7.5/10
Texture:
8/10
Overall score:
7.75/10

Monday, 21 April 2014

Recipe: Chocolate salted caramel marble cake


Recipe: Chocolate salted caramel marble cake
Source:
Heat (Issue 776, 5th–11th April 2014)


Growing up, a feature of Easter day in our family was always my Mum’s Springtime marble cake. This was a marble effect ring-shaped cake that was coated in chocolate icing, and filled in the centre with mini chocolate eggs, giving the impression of a nest. It’s been a few years since we’ve had this, now, so when I stumbled across this recipe in Heat magazine (of all places!) on a Stork promotional page, I just had to make it our Easter dessert this year.


The Chocolate salted caramel marble cake was always going to be a richer option than my Mum’s more traditional recipe. The white part of the sponge contained white chocolate rather than being plain, it had an inner salted caramel sauce, and it was topped with truffles. I couldn’t wait to ‘make this Easter marble-ous’ (Stork’s words, not mine!).


Although I followed the recipe printed in my magazine, a version of it can also be found on Stork's website where there is also a useful video (I did watch this prior to baking but not immediately before so I may well have done things differently!).


The only change I made to the recipe was using two types of caster sugar. About half of the quantity I used was the normal kind but I did mix golden caster sugar in to make up the amount as that’s what we had in stock.


The recipe for the cake itself was very easy – so much so that there’s nothing to really say about it! I followed all the instructions in the magazine and ended up with a decent cake. It did take five minutes longer to bake than had been suggested but that was the only issue at this stage. Once cooled, I did get someone else to slice the cake in two – I struggle to even cut a loaf of bread so I didn’t want to ruin my creation!


At the final stages of assembly, things did start to go a little wrong. When I added the inner caramel layer, it began too ooze out of the sides which made me nervous of adding too much. As a result, I think I used less than the recommended half of the mixture. This had implications on the truffles since the recipe said to make them from the left over ganache and caramel (the video on the website didn’t mention using the caramel in the truffles but this was part of the cake’s novelty for me so I just had to!). Since the caramel was runnier than the ganache and there was more of it, I didn’t want to mix everything in together and end up with a liquid mess that I couldn’t use. Instead, I tried chilling a teaspoon of the chocolate mixed with a teaspoon of the caramel and seeing how it worked...it didn’t!


By this stage, it was late on Saturday night and I needed the cake to be sorted ready for the next day (Easter!) so I didn’t have time to be patient. I’d left the separate bowls of ganache and caramel to chill so they were relatively firm so I decided to just go for it. I made a ball shape with the chocolate, drizzled some caramel over the top, rubbed the ball a bit more, and then plunged it into cocoa powder as I kept rolling the truffle. This was extremely messy as the mixtures were too soft, really, to be working with, but I did manage to get some kind of truffles out of the process. Ok, they looked a mess as they were squidgy rather than round (my family decided they looked like boulders!) but by the time they’d chilled in the fridge overnight, they were the perfect consistency! If I’d had the time to deal with them on Easter morning, I would have made them then instead, but that just wasn’t an option for me, unfortunately.


The main thing was that everyone absolutely loved the cake. I was told it was ‘a bit special’ and it was well received by all. Despite containing a lot of chocolate (particularly dark), it wasn’t too heavy, and the balance with the salted caramel was spot on. I always use my three year-old nephew as an indicator of the overall verdict and he ate the whole of his slice without problem...and this was straight after our roast lamb dinner!


The good thing about my caramel filling going, perhaps, a little wrong, was that I had a jug of the sauce left over which we could then pour over the top of the cake. This worked really well and, again, lifted the flavour to prevent it being too dominated by chocolate.


It may have looked a bit of a mess but this was a big hit and I’ve even been asked for the recipe. I’d definitely be happy to give it another go when I have a bit more time on my hands!


Ease of recipe: 9/10
Finished product:
8.5/10
Overall score:
8.75/10
Bake again?
Yes
Related Posts Plugin for WordPress, Blogger...