Showing posts with label Custard. Show all posts

Thursday, 30 October 2014

Nakd Rhubarb & Custard


Product name: Nakd Rhubarb & Custard
Purchase details:
£0.75 for a 35g bar or four for three, cheapest product free (tesco.com)
Calories:
128 per bar
Country of origin:
Britain

I was really intrigued by this variety of Nakd as I loved rhubarb crumbles with custard when I was a kid, but also knew that I don’t like rhubarb to be too tart, and that part of the joy of custard is the texture. I wasn’t sure what angle this bar would take but, hey, I knew I at least liked its purple and yellow wrapper!


This Natural Balance Foods bar was along the same lines as the Strawberry Crunch in terms of features but the variety contained the fewest number of ingredients out of the ones I’ve reviewed so far – it simply consisted of dates (55%), cashews (25%), raisins (19%), and a ‘hint of natural flavours’ which is presumably where the rhubarb and custard taste was going to come from!


The natural, fruity stick still wasn’t the most attractive in the world, but it had more of a dark pink appearance than the other ones I’ve tried. Its overall style was the same but I did like to see that the cashew nuts inside were pretty large. Its scent was slightly unusual but seemed to be a combination between raisins and jelly.


On trying this Nakd Rhubarb & Custard, my first thought was that it tasted a bit like purple Rowntree’s Fruit Pastilles – my favourite type! However, I could also taste the nuts, and there was a mellow vanilla flavour that was a bit custard-like and built nicely into a more dominant feature. Thankfully, there was no tartness, but a nice, sweet fruity flavour at an attempt at rhubarb. I was actually quite surprised that the product was dairy-free and that there was no added sugar since there was a bit of a creamy flavour mixed in with the delicious sweetness too.

This soft bar with added crunch was definitely my favourite from the range so far and one I’d definitely want to buy again. Yummy!

Appearance: 6.5/10
Aroma:
6/10
Taste:
8/10
Texture:
7.5/10
Overall score:
7/10

Wednesday, 30 July 2014

Recipe: Nanaimo bars


Recipe: Nanaimo bars
Source:
My Kitchen Antics

We had a big family event at the weekend that required lots and lots of cake! I was happy to help and was asked to make something that would serve 20+ people. As well as being tasty, it needed to be something that could be stored for a couple of days, wasn’t messy to eat and, since I work full-time, I also wanted it to be incredibly easy to make or a recipe that I’d successfully made before. I opted for the latter...


I was first told about Nanaimo bars by a colleague in my old work. She told me they originated in Canada and, once I’d looked them up on Wikipedia, I knew I just had to make them. When the time came, I settled on this recipe from My Kitchen Antics (adapted from The Boy Who Bakes) because I was too lazy to follow a recipe that used cups for measurements, and I also liked the way it had added pecans to the base.


The first time I ever made these, I also made a peanut butter version (following a different recipe), and both types were a big hit. I’ve made this ‘original’ recipe again since and they turned out exactly the same – no problems! My memory did fail me, though, as I was thinking I’d only previously got 16 pieces out of the batch rather than the predicted 20–25, so I ended up making two batches for the weekend...I ended up with 40 slices. Oh well, the more the merrier!


For some reason, I didn’t read the recipe properly on this occasion, so I lined my baking trays with greased baking paper rather than foil. Whilst this did turn out ok, it made it harder to ease the finished product from the tins, so I’ll definitely be sticking to the foil in future!


The recipe was as easy as I remembered it. I used digestive biscuits which I whizzed in the food processor and the smell of these combined with the coconut was fantastic. When preparing the cocoa mixture for the base, I loved watching it turn silky and thick and, once combined with the rest of the ingredients, all the elements held together really well and left the mixing bowl clean once transferred to the baking tray. It smelt delicious and tiffin-like, although its slightly greasy appearance didn’t look promising in terms of any health benefits. (Who am I kidding? This was never going to be a healthy treat!) In terms of pressing this layer down into the tin, I’ve always found that the back of a metal serving spoon does the job nicely.

 
The middle layer was my only cause for concern on this occasion. When mixing the butter and icing sugar, it didn’t go smooth before I added the cream (as the picture shows), and I couldn’t remember if that had happened before. I carried on regardless and, thankfully, everything turned out fine. For this layer, I used a spatula to spread it evenly.


I was slightly nervous about the final layer of these bars as my last experience was of making an orange version where I made the stupid mistake of setting the heat too high and leaving the chocolate for the full two minutes without checking on it. The result was a burnt-tasting ganache! I definitely learnt from my error and had no further problems this time so I quite happily applied it to the top of the traybake with a palette knife.


The only downside of this recipe is that it does require patience in taking time to spread each layer out carefully (although I’m a non-artistic perfectionist so probably take longer than most!) and then leaving them to set. On this occasion, my start to end baking time was around five hours but, bearing in mind I made two batches, stopped for lunch, had a couple of fights with cling film (urgh) and realised part way through that I didn’t have enough icing sugar and had to wait for more to arrive, this seemed totally reasonable. Even better was the fact that I remained stress-free throughout!


Most importantly, the Nanaimo bars were as rich as ever. They had a lovely chocolatey taste with a subtle coconut flavour and chunky pecans. I guess they weren’t too dissimilar from other chocolate traybakes, but I think these Nanaimo bars were sweeter than most, although this was mellowed greatly by the chocolate. I’ve always found that the custard adds more texture than flavour, whilst the icing sugar provides a different, slightly grainy texture in the middle layer, which is also something different to other similar treats.

 
As for the crowd, they were definitely pleased – I only heard positive comments from those who tried them and some people raved and raved. I know I’ll be making these for years to come!

  
Ease of recipe: 9.5/10
Finished product:
9/10
Overall score:
9.25/10
Bake again?
Yes

Thursday, 20 March 2014

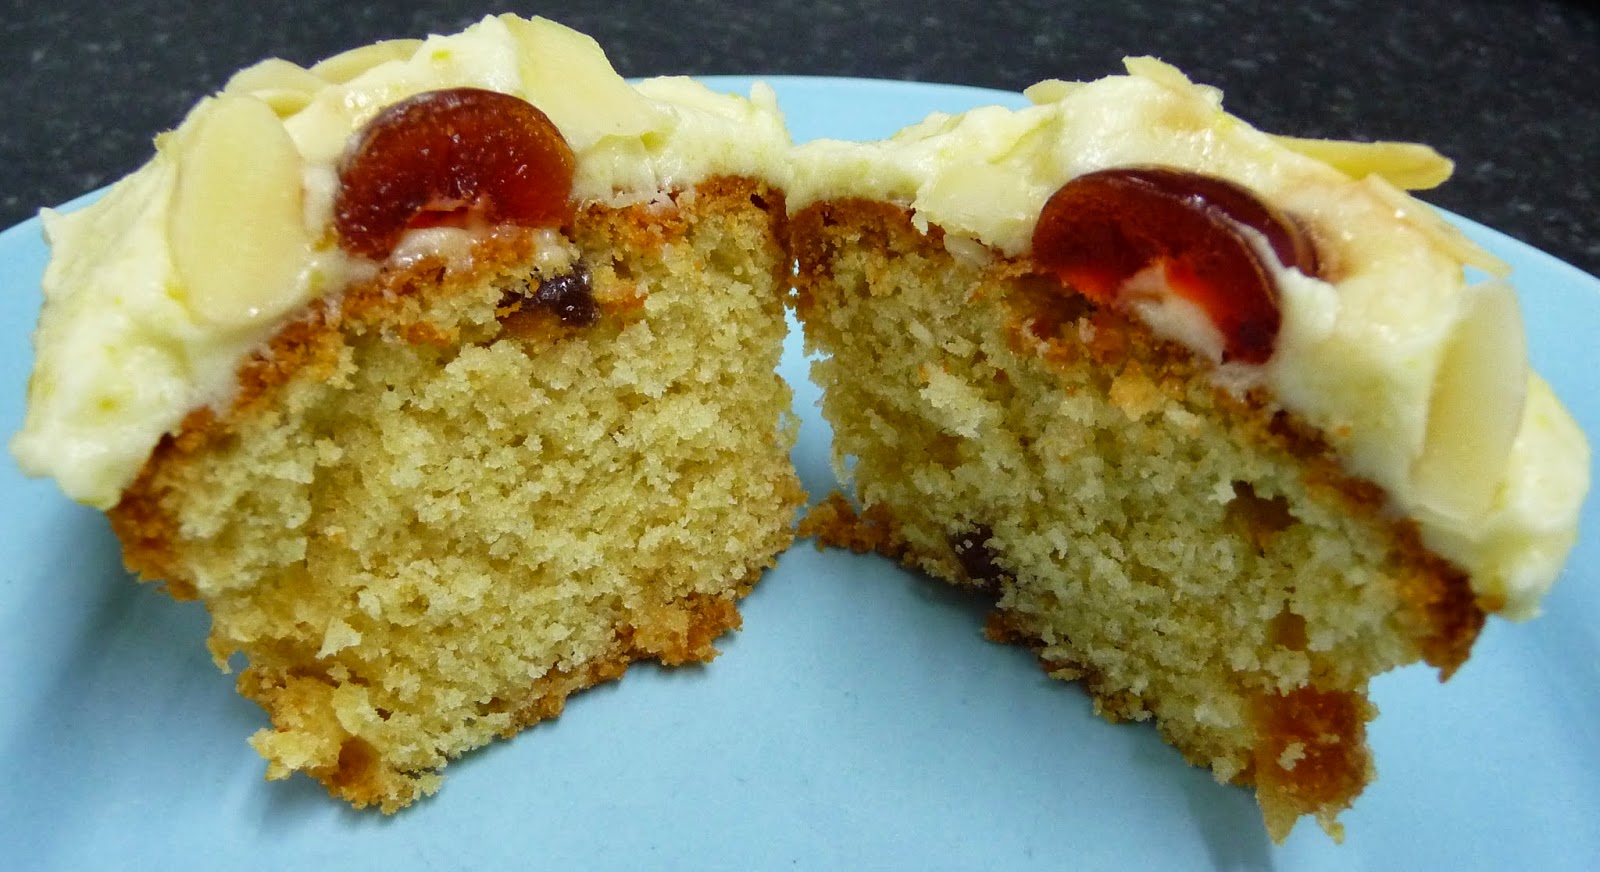
Recipe: Cherry bakewell cupcakes


Recipe: Cherry bakewell cupcakes
Source:
Favourite Cakes, Bakes & Cupcakes – Good Housekeeping (Collins & Brown, 2010)

We recently had a laid-back afternoon tea in honour of my sister-in-law’s birthday. There were a few flavour combinations she’d requested for her cakes so I opted to make something containing cherry and almond. After flicking through various recipe books, and having a look online, I opted for these Cherry bakewell cupcakes from the Good Housekeeping Favourite Cakes, Bakes & Cupcakes book that I’d recently bought but not yet used. If you don’t have it, the recipe can also be found here.


I increased the quantities in the recipe by half in order to achieve a yield of 18 cakes but, other than that, the only change I made was decorating them with flaked almonds and glacé cherries rather than red sugar sprinkles in order to add a bit more flavour. My original plan had been to organise them to look like flowers but, in the shop, I realised this wouldn’t be possible since very few or the almonds in each bag were perfectly formed!

The recipe was supposed to take 30 minutes to make, 25 to bake, plus cooling and setting time. I always allow extra time as I’m a slower-than-average cook but, in the end, it took me quite a lot longer!


The cake itself was incredibly easy to make – I even managed to get round the problem of needing four and a half medium eggs by substituting one of them for a large one. (I was proud of my logic here until I realised I’d accidentally deleted the picture of the ingredients that included them – I’d forgotten to add the eggs in the picture I’ve posted here!) The mixture was more doughy than liquidy so I was unable to use the ice cream scoop trick when transferring it into the paper cases, like I had done with the Boston cream cupcakes, but I found each one took about two very loaded teaspoons, plus an extra half a teaspoon. The dough smelt strongly of almonds and it tasted beautiful – sweet, buttery and nutty – I’m not sure I’ve ever licked a bowl so clean before!


The cakes did take slightly longer to cook through than they were supposed to but this was because I had to keep swapping the oven shelves around to make room for the extras I’d made. I accidentally let them go more brown than golden, due to being distracted by the icing, but they were by no means burnt and we actually found this slightly crispy top layer went well with the other textures in the finished product. Usefully, the baked cupcakes could be frozen prior to icing, if necessary.

The frosting was unlike anything I’ve ever done before. It was described as ‘custard cream’ and was made in different stages: making a custard, cooling it, adding butter, chilling it, then adding icing sugar. This was where things started to go a bit wrong for me!


The first set of custard I made didn’t seem right at all. Having been cooled, it was incredibly thick and jelly-like. Hoping it would sort itself out when whisked with the butter, I proceeded, but despite attempting to add extra warm milk, and whisking it for a long time, it was impossible to get rid of tiny globules of congealed custard that were visible throughout the mixture. Whilst I had plenty of custard powder, milk and butter, I didn’t have enough icing sugar to risk adding it, so I chucked the custard-butter mixture and started again.

For my second attempt at the custard, I was a lot more vigilant about the measurements, ensuring that I’d levelled out the custard powder on the tablespoon to ensure I didn’t add too much. At first, this seemed to make a difference but, once cooled, it again became a wobbly mass.

By this point, I was running out of time and, knowing that the butter mixture would have to be chilled for half an hour and then I’d still have to gradually add the icing sugar, physically decorate the cakes, and then leave to set for an hour, I took the plunge and didn’t allow my final attempt at the custard to cool. Instead, I whisked the butter in straight away. Unsurprisingly, this caused the butter to melt, and the mixture really didn’t look attractive, but I just had to hope it would all work out when I added the sugar!

When I whisked in the icing sugar, unfortunately, the custard still decided to form tiny globules. I had no choice but to continue but, as the mixture became lighter in colour, these yellow flecks became more obvious – my sister-in-law was in the kitchen at this point and asked if I’d added lemon rind! A few of us had a tiny sample and found that it tasted absolutely fine (nice and sugary!) and, whilst there was a slightly bumpy texture to it, it wasn’t terrible or even that noticeable. Once I’d added the almond and cherry topping, I was pleased that the yellow flecks were even less obvious and, from a distance, they weren’t visible at all.


I’m not actually a huge fan of glacé cherries but, having made these cakes myself, they seemed a lot more appealing! The almond flavour was a lot stronger than the cherries, and the sweet custard-flavoured icing worked well – I felt that they really did taste like bakewell tart in cake form, although it would have been nice if there was some jam in there somewhere too. The cake wasn’t incredibly moist but, particularly with the icing, it wasn’t dry either.


Everyone enjoyed these cupcakes and, looking back, I should have stuck with the first batch of icing as it ended up making no difference whatsoever. Like I’ve found before, my three year-old nephew tucked straight into the icing but, what surprised me was he also ate the cherry and almond topping and, once the frosting had gone, he proceeded to eat the entire cake. It was pretty big for such a small person and I’ve never known him so quiet for so long – nothing was coming between them!


Although my experience with this recipe wasn’t the best, the end result felt worth it and, knowing what I do now about the icing, I would happily make these cupcakes again in less than half the time.

Technically, the 405 calories-containing cakes could be kept for two to three days in an airtight container in the fridge, but we found they tasted a lot fresher on the day they were made. 

Ease of recipe: 8/10
Finished product:
8/10
Overall score:
8/10
Bake again?
Yes

Saturday, 23 November 2013

Jammie Dodgers Banana & Toffee


Product name: Jammie Dodgers Banana & Toffee
Purchase details:
£0.39 for a 140g packet (Home Bargains)
Calories:
75 per biscuit
Country of origin:
UK
 

Earlier this month, I reviewed Jammie Dodgers Jam'n Custard and, whilst they were fine, I was left feeling slightly disappointed. I’d actually bought this Banana & Toffee packet before I’d tried and reviewed the Jam'n Custard biscuits so, by the time I got around to opening it, my expectations weren’t very high.


These Jammie Dodgers Banana & Toffee were very much a continuation of the brand. Once again made by Burton’s Foods Limited, they came in a similarly-designed wrapper to the Jam'n Custard biscuits, albeit with dark yellow and orange colours being used to represent the different flavour, and a splat of toffee instead of jam. The product image was almost identical too – the filling colours had simply been reversed and the darker side was a bit lighter.

Intriguingly, this packet weighed in at 10g lighter than the Jam'n Custard, although the wrapper claimed the ‘bonkers banana and tasty toffee’ flavour was ‘twice the fun’. There were no claims of using no artificial colours or ingredients, this time, but there was still no hydrogenated fat, and no GM ingredients had been used either. The final change was that each biscuit had eight fewer calories – winner!

I didn’t bother reading the product description when I purchased this treat – I just assumed the custard would be banana flavoured and that there would be toffee sauce instead of jam. Oh how wrong I was! I was very interested to see that the sandwich biscuit filling actually consisted of ‘banana flavoured jam’. That’s right. Banana. Jam. How bizarre! This contributed to 13% of the product and contained 1.5% banana juice from concentrate and 1% banana purée. As for the toffee, this was in the 13% custard filling, instead, and I was also pleasantly surprised to see that the biscuits themselves were toffee flavoured.


As suggested by the wrapper’s image, the biscuits had the same attractive overall design as the Jam’n Custard ones although I thought the ridges around the decoration seemed deeper to me – maybe that was just my imagination? The banana jam was more yellow than the wrapper (and my own photographs) suggested to the extent that it made me think of lemon curd. Although I don’t dislike lemon, I’m not a huge fan of it, so I had to make a conscious effort to get this connection out of my head! 


I had more success in cutting one of these biscuits open (although it was still very sticky!) which revealed an inner designated section for the filling – something I’d not noticed previously. The custard had the same shiny, gooey appearance whilst the toffee biscuits were a slightly different colour and had a visibly bitty base – I’d noticed that 3% of the ingredients consisted of crisped rice so I figured that this was what the flecks were.


This product had the usual Jammie Dodger biscuity smell, as well as a very, very slight banoffee aroma. Although the biscuits did still have the slightly stale taste that I don’t particularly enjoy, the additional flavour did mean that they were sweeter so they had been improved (not that I’d have consciously have made a connection with toffee!). Unfortunately, the texture was still more crumbly than I would have liked, but I did enjoy the added crispiness from the rice pieces.


Whilst I found it hard to differentiate between the two sides of the filling, the overall familiar banoffee flavour came through. The toffee flavour alone wasn’t very powerful but I did find the banana element, whilst slightly artificial, to be pleasantly strong and certainly recognisable. Texturally, the filling was chewy, as expected.

Whilst these Jammie Dodgers Banana & Toffee have equalled the Jam'n Custard biscuits’ overall score, I do think that this variety made improvements by infusing the biscuits themselves with a toffee flavour, as well as adding a bit of extra texture. I also found the variety’s flavour to be more unique and memorable. As a result, in future, this is the version I would choose. 

Appearance: 8/10
Aroma:
6/10
Taste:
7/10
Texture:
7/10
Overall score:
7/10
Related Posts Plugin for WordPress, Blogger...